Configuration
This guide covers how to configure the NetDefense plugin through the OPNsense web interface.
Accessing NetDefense Settings
Section titled “Accessing NetDefense Settings”-
Log in to your OPNsense web interface
-
Navigate to Services > NetDefense > Settings
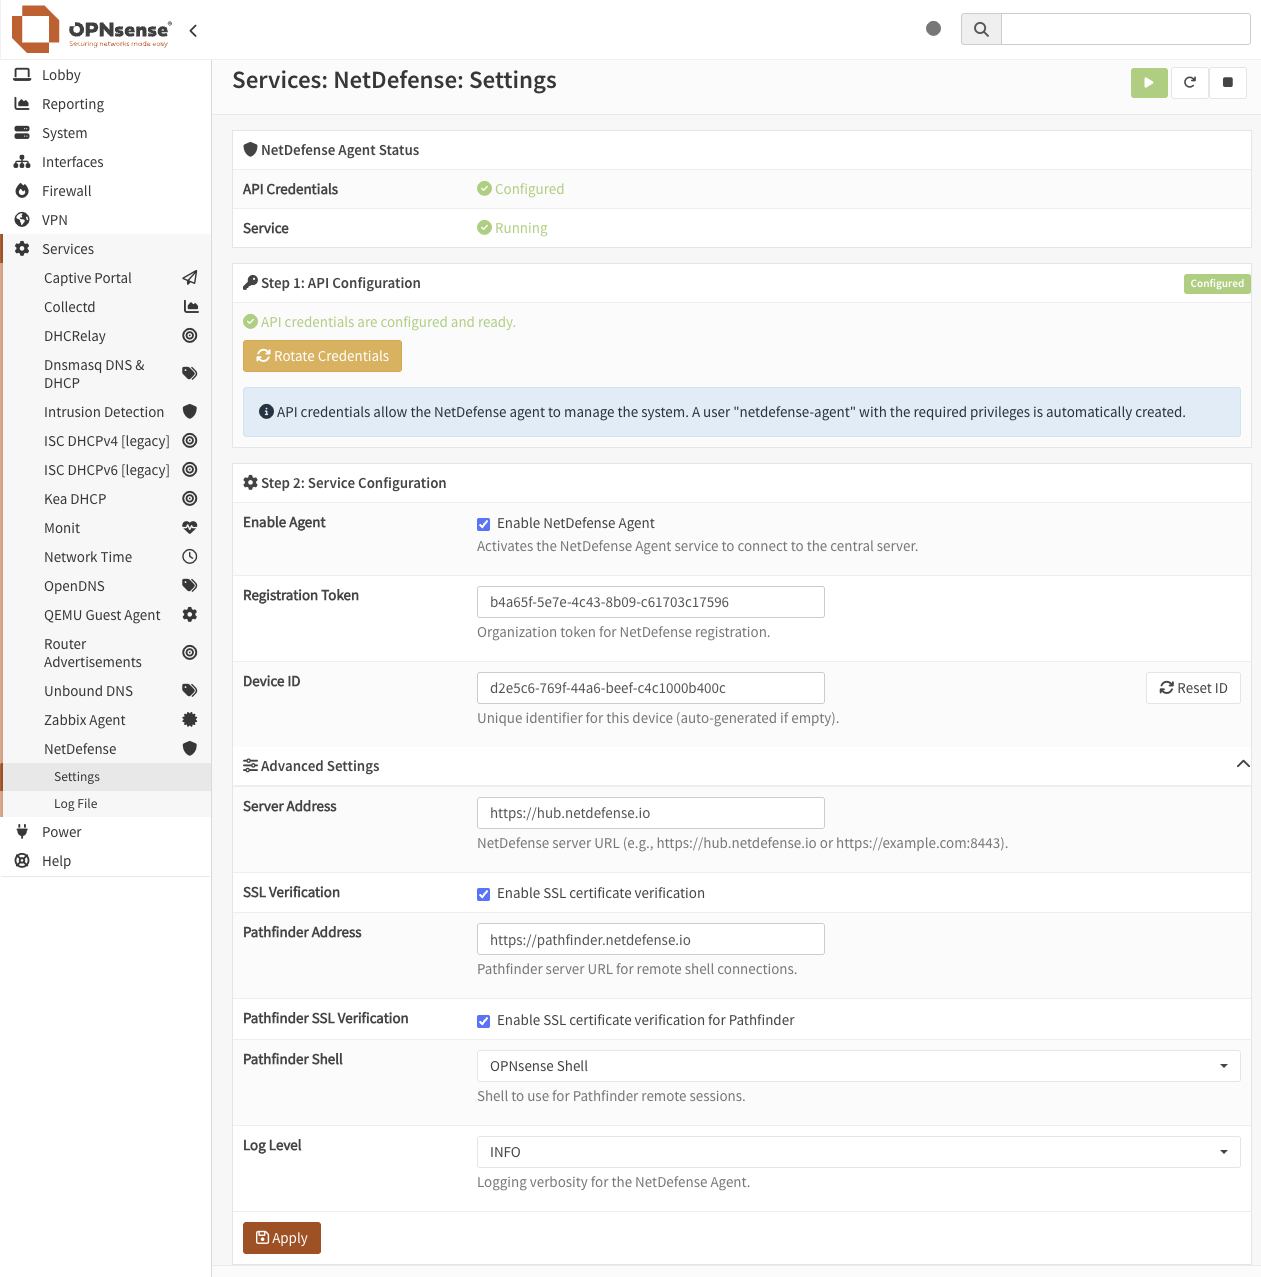
Basic Configuration
Section titled “Basic Configuration”The settings page is organized into two steps followed by an advanced section.
Step 1: API Configuration
Section titled “Step 1: API Configuration”| Setting | Description |
|---|---|
| API Credentials | OPNsense API key and secret used by NDAgent to manage the system. A dedicated netdefense-agent user with the required privileges is automatically created on first use. The status indicator shows whether credentials are configured and ready. Use the Rotate Credentials button to generate a new key/secret pair. |
Step 2: Service Configuration
Section titled “Step 2: Service Configuration”| Setting | Description |
|---|---|
| Enable NetDefense Agent | Activates the NetDefense Agent service to connect to the central server. |
| Registration Token | UUID token provided by your NetDefense organization for device registration. |
Advanced Settings
Section titled “Advanced Settings”Click the Advanced Settings toggle to reveal additional configuration options, grouped by what they affect.
Control Plane — how this device reaches NetDefense:
| Setting | Default | Description |
|---|---|---|
| Device ID | Auto-generated | Unique UUID identifier for this device. Auto-generated on first load if empty. |
| Server Address | https://hub.netdefense.io | NetDefense server URL. Only change if using a self-hosted deployment. |
| SSL Verification | Enabled | Verifies SSL certificates when connecting to the NetDefense server. |
| TOFU Key Fetch SSL Verification | Enabled | Verifies the certificate on the one-time trust-key fetch, independently of the setting above. |
Remote Access — whether and how anyone can reach a session on this device:
| Setting | Default | Description |
|---|---|---|
| Pathfinder Address | https://pathfinder.netdefense.io | PathFinder server URL used for remote sessions. Only change if using a self-hosted deployment. |
| Pathfinder SSL Verification | Enabled | Verifies SSL certificates when connecting to PathFinder. |
| Pathfinder Shell | OPNsense Shell | The shell launched when a remote session is opened via ndcli device connect. Any shell installed on the device (e.g., bash, sh, csh, tcsh) appears as an option. |
| Remote Access Policy | Full access | The device’s own ceiling on remote sessions. Cannot be raised remotely. |
Configuration Sync — what this device will accept in a pushed configuration:
| Setting | Default | Description |
|---|---|---|
| Allow All Snippet Content | Disabled | When left off, the device refuses privileged snippet content instead of applying it. |
Maintenance:
| Setting | Default | Description |
|---|---|---|
| Log Level | INFO | Controls the verbosity of agent logs (DEBUG, INFO, WARNING, ERROR). |
| Re-bind Token | Empty | One-time token used to re-bind this device’s signing key. |
Enabling NetDefense
Section titled “Enabling NetDefense”-
Navigate to Services > NetDefense > Settings
-
Check the Enable NetDefense Agent checkbox
-
Enter your Registration Token
Your registration token is available from your NetDefense organization settings. It should be in UUID format (e.g.,
12345678-1234-1234-1234-123456789abc). -
Click Apply
The agent will start and attempt to register with the NetDefense server. Check the Log File to monitor the registration process.
Disabling NetDefense
Section titled “Disabling NetDefense”-
Navigate to Services > NetDefense > Settings
-
Uncheck the Enable NetDefense Agent checkbox
-
Click Apply
This will stop the NetDefense Agent service. The device will go offline in your NetDefense dashboard but will retain its configuration for when you re-enable it.
Configuration Reference
Section titled “Configuration Reference”API Credentials
Section titled “API Credentials”NDAgent requires OPNsense API credentials to apply configuration changes to the firewall. The plugin automatically creates a dedicated netdefense-agent OPNsense user with the minimum required privileges and generates an API key/secret pair for it.
You can rotate the credentials at any time using the Rotate Credentials button — for example, to comply with a key rotation policy, after a suspected compromise, or following personnel turnover. The agent picks up the new credentials automatically with no restart or downtime required.
Registration Token
Section titled “Registration Token”The registration token links your OPNsense device to your NetDefense organization. Obtain this token from your NetDefense organization settings:
-
Log in to your NetDefense account
-
Navigate to Organizations and select your organization
-
Copy the Registration Token
Device ID
Section titled “Device ID”Each device requires a unique identifier. It is automatically generated when the settings page first loads. Use the Reset ID button to generate a new UUID if needed.
Server Address
Section titled “Server Address”The server address specifies which NetDefense server the agent connects to for configuration syncs and management:
- Default:
https://hub.netdefense.io(NetDefense cloud service) - Self-hosted: Enter your self-hosted NetDefense server URL (e.g.,
https://netdefense.example.com:8443)
SSL Verification
Section titled “SSL Verification”When enabled (default), the agent verifies the SSL certificate of the NetDefense server. Only disable this when using a self-signed certificate on a self-hosted deployment, or temporarily while troubleshooting connectivity issues.
TOFU Key Fetch SSL Verification
Section titled “TOFU Key Fetch SSL Verification”The very first time the agent connects, it fetches and pins the platform’s signing keys. This setting controls certificate verification for that one fetch only, and it is deliberately independent of SSL Verification above.
The reason they are separate: if a single toggle covered both, turning off certificate checks for day-to-day traffic on a lab or self-hosted deployment would also open the one moment when the device decides which keys to trust forever. Keeping this on means that even a device running with SSL verification disabled still validates the certificate before pinning anything.
Leave it enabled unless you are pinning against a self-signed deployment and understand that a rogue key planted during that fetch would be trusted from then on.
Pathfinder Address
Section titled “Pathfinder Address”The address of the PathFinder relay server, used to establish remote shell connections via ndcli device connect:
- Default:
https://pathfinder.netdefense.io(NetDefense cloud service) - Self-hosted: Enter your self-hosted PathFinder URL
Pathfinder SSL Verification
Section titled “Pathfinder SSL Verification”When enabled (default), the agent verifies the SSL certificate of the PathFinder server. Follows the same considerations as SSL Verification above.
Pathfinder Shell
Section titled “Pathfinder Shell”Selects the shell that is launched when a remote session is opened via ndcli device connect. The dropdown lists all shells currently installed on the device. OPNsense ships with several shells by default (sh, csh, tcsh, and the OPNsense interactive menu). Additional shells installed on the device (e.g., bash) will appear automatically as options.
Remote Access Policy
Section titled “Remote Access Policy”Sets a ceiling on remote sessions to this device. The platform may request a session at or below the ceiling, and never above it:
| Value | What the device will serve |
|---|---|
| Full access (default) | Whatever is requested — interactive shell, SSH, and the web UI. |
| Read-only web UI only | The web UI and nothing else. No shell, no SSH, no command execution, regardless of the privilege held by whoever asked. |
| Disabled | Nothing. Remote sessions are refused outright and no relay connection is made. |
This is the device’s own decision, and it is the one setting on this page that cannot be changed remotely. The value lives in this firewall’s configuration, and the agent has no way to write it — so it cannot be raised by an operator account, by a configuration sync, by an AI agent using the MCP tools, or by the NetDefense platform itself. Changing it requires access to this device.
Existing devices default to Full access, so upgrading changes nothing until you opt in.
Allow All Snippet Content
Section titled “Allow All Snippet Content”Controls whether this device applies privileged content inside a pushed configuration, or refuses it.
Left off (the default), the device rejects individual snippet elements that would grant broad privileges, create system-scope accounts, give an account an interactive shell, install SSH authorized keys, or enable Zabbix remote commands and sudo — and the sync reports which element was refused and why.
Turn it on only if you legitimately push service accounts or monitoring configuration that needs those capabilities. Check the agent log first to see exactly what is being refused.
Devices upgrading from a release before this setting existed keep their previous behaviour automatically; the default applies to newly configured devices.
Log Level
Section titled “Log Level”Controls the verbosity of the NetDefense Agent logs:
| Level | Description |
|---|---|
| DEBUG | Detailed diagnostic information. Use for troubleshooting. |
| INFO | General operational information (recommended for production). |
| WARNING | Warning messages for potentially harmful situations. |
| ERROR | Error events that might still allow the agent to continue running. |
Re-bind Token
Section titled “Re-bind Token”A one-time token used to re-bind this device’s signing key — after a suspected key leak, a hardware replacement, or a routine rotation.
Your NetDefense administrator issues the token with ndcli device rebind-token <name>. Paste it here and save; the agent generates a new keypair and re-registers automatically. The token expires 24 hours after it is issued and can only be used once.
Clear this field once the device shows ENABLED again, so a subsequent re-bind requires a freshly issued token.
Viewing Service Status
Section titled “Viewing Service Status”Via Web Interface
Section titled “Via Web Interface”Navigate to Services > NetDefense > Log File to view real-time agent logs. This integrated log viewer shows:
- Service start/stop events
- Registration status
- Connection events
- Task execution results
- Any errors or warnings
Via Command Line
Section titled “Via Command Line”service ndagent status
tail -f /var/log/ndagent.log
grep ndagent /var/log/messagesApplying Configuration Changes
Section titled “Applying Configuration Changes”After making any configuration changes:
-
Click the Apply button at the bottom of the settings page
-
The service will automatically restart with the new configuration
-
Check the Log File page to confirm the service started successfully
User Permissions
Section titled “User Permissions”Access to the NetDefense plugin requires the Services: NetDefense permission. To grant access:
-
Navigate to System > Access > Groups
-
Edit the desired group
-
Under Assigned Privileges, add Services: NetDefense
-
Save the changes
This grants access to:
- NetDefense settings page
- NetDefense log viewer
- NetDefense API endpoints